Thursday, September 24, 2015

Embedded packet capture and interface ACLs and Zone Based Firewall

Cisco IOS Embedded packet capture is a great tool for trouble shooting. Very similar to the ASA capture command.

It could be better, as it won't parse the packets as good as tpcdump, but it is way better than nothing.

However I couldn't figure out what the order of operation, with regards to ACLs and ZBF.

So I labbed it up, with IOU 15.4, and here are the results:

  • For incoming ACL, packets are captured before ACL is evaluated
  • For incoming ZBF policy, packets are captured before the policy is checked.

So it looks like the embedded packet capture is placed at the right place, right before incoming ACL/ZBF check. However more testing needed to be done: NAT, outgoing ACL/ZBF, IPS drops,  encryption, sanity checks

I wish Cisco would have published an official and full "order of operation". Here is the best I have found so far.

FYI....

Friday, July 31, 2015

FirePower management interface

While installing Cisco FirePOWER on 5545-X, I was following the "Install and Configure a FirePOWER Services Module on an ASA Platform" guide.

One of the steps was to configure an IP address to the FirePower management interface. However, nowhere in the document it was mentioned how would that interface connect to the outside world.

So I tired to google it, and it looks like no one was asking that question: How would an internal module connect to the outside world? Not a single blog post about it. It just worked for everyone, no questions asked!

After digging around I found this document: "Cisco ASA FirePOWER Module Quick Start Guide"

And there I have found my answers:
  1. For 5585-X, FirePOWER is installed on a dedicated slot with its own mgmt0 interface.
  2. For 5545-X, FirePOWER module (SRF) is using the 5545-X's management0/0 interface. Which means that we can not use that interface for managment and it must be dedicated to FirePOWER!
  3. For the rest, it will use the "inside" interface.
 I would have expected a command to allow me to set up a bridge between the SRF management interface and some ifname on the ASA. But no, it is hard wired! Why?

Friday, February 20, 2015

Alteon AppShape++ persistency and multiple scripts per service

Lab goal

Create new VIP on 10.136.6.17.

Using an AppShape++ script to choose the preconfigured group/pool "10".

Once the laodbalancer chooses a server, all requests from the client's source IP should go to the same server. This is called persistence or stickiness.

Setup

I'll use my Loadbalancer Lab Setup.

The loadbalancer is Radware's Alteon VA version 29.5.1.0

The initial Alteon VA configuration can be found here.

Notice the group and hosts are preconfigured:

 1
 2
 3
 4
 5
 6
 7
 8
 9
10
11
12
13
14
15
16
17
/c/slb/real 1
        ena
        ipver v4
        rip 10.136.85.1
/c/slb/real 2
        ena
        ipver v4
        rip 10.136.85.2
/c/slb/real 3
        ena
        ipver v4
        rip 10.136.85.3
/c/slb/group 10
        ipver v4
        add 1
        add 2
        add 3


Alteon configuration

First the AppShape++ script:

 1
 2
 3
 4
 5
 6
 7
 8
 9
10
/cfg/slb/appshape/script take_10/en/import


attach group 10

when HTTP_REQUEST {
    group select 10
}

-----END

Line 1 - This allows to just copy paste the whole text to Alteon's CLI. It defines a script if its not exists, enable it and imports it.
Line 7 - Selects group 10.

Next, lets configure VIP/virt with its services:

 1
 2
 3
 4
 5
 6
 7
 8
 9
10
11
/c/slb/virt 6_17
       ena
       ipver v4
       vip 10.136.6.17
/c/slb/virt 6_17/service 80 http
       group 1
       rport 80
       pbind clientip norport
       dbind forceproxy
/c/slb/virt /service 80 http/appshape
       add 10 take_10

Line 8 - Add the stickiness/persistence part, based on the clients IP address.
Line 11- Add AppShape++ script.


Test


This didn't go well. We still see that all servers were used and not just one.

The reason for that is that once we select a group/pool using AppShape++, Alteon will ignore pbind settings.


Another try

AppShape++ has the following command : persist

This command can be used to create a persistence/stickiness .

One way we can use this command is by fixing our script. Another way would be to create another script and add it to the service. Using a separate script will allow us to reuse that script on more than on service / VIP.


1
2
3
4
5
6
7
/cfg/slb/appshape/script persist/en/import

when HTTP_REQUEST {
    persist source_addr 255.255.255.255
}

-----END

Line 4 - Create persistence/stickiness by using the source IP address with /32 mask.

Now lets add it to the service:

1
2
/c/slb/virt 6_17/service 80 http/appshape
       add 16 persist

Line 2 - We have added the new AppShape++ script to the service. We use priority 16  which means this will run after priority 10 which was take_10 script.


Another Test 

It works! SRV3 was selected for all HTTP requests.

We can also have a look at the persistance table:


1
2
3
4
5
>> LB1 - Persistency Information# /i/slb/persist/dump 

 Printing Data Table Entries for SP 1
key-10.136.3.1,vs:10.136.6.17,80,g:10,value-g:10 rs:3 80, age 178
Total number of session IDs: 1

Line 1 - Is the command to show all persistence object, in yellow.
Line 4 - Me in red, is using SRV3 in green, and the idle timeout is 178 seconds in blue.


Summary

So we learned that not everything we configure on the VIP/virl service applies when we use AppShape++.

We also learned how and why to use more than one script per service.

Enjoy...

Monday, February 2, 2015

ACS 5.X REST API

For a typical network engineer, reading Cisco's REST API documentation looks really simple. All you need to do is to issue the following CLI command
acs config-web-interface rest enable.
But now what? Where are the examples? Thats easy, all you need to do is to download example code directly from the ACS administration UI. But that code is in Java, and several pages long for each example.
So let me do you a favor and show you how to extract a list of all ACS users without even writing a single line of code:
wget -O user-list.xml --auth-no-challenge --http-user=acs_admin_user --http-password=admin_pass --no-check-certificate https://acs.ip.address.x/Rest/Identity/User 
Few things to notice:
  • Its a one line command UNIX command. A windows version can be found here.
  • The output is XML file called user-list.xml
  • --no-check-certificate is needed because ACS has its own self generated SSL certificate, and wget will fail to authenticate that certificate. This can be changed, but how many are actually using anything else?
  • --auth-no-challenge is used because ACS expects to use preemptive authentication.
Enjoy!

Thursday, January 29, 2015

CCIE Lab or dual CCIE written preferred

I got this sent from a friend of mine who is looking for a job. The job description asked for "CCIE Lab or dual CCIE written".

I wonder who wrote this stuff?

CCIE written is easy. It is not a certification exam.

The exam is not intendant to mean anything other than a ticket for the lab or to recert and existing CCIE certification, so Cisco is not putting too much effort into it. For example there are no simulations, everything is a multi-choice, so it is easy to eliminate absurd answers.

Most if not all CCIE candidates, who are already CCNPs, are surprised how easy it is. Many are fooled to believe that the lab is anywhere close to being at the same level of difficulty and depth.

If I was a CCNP, I would have preferred to take CCIE written to recert over the CCNP exams.

If I was hiring, I would prefer a dual CCNP over dual CCIE written anytime. In fact, I would prefer a humble CCNP than someone who passed the written and brags about it.

Monday, January 26, 2015

VIRL - A slow greatness

I had a migration project from 6500 to ASRs. I have decided to check out VIRL.

My migration setup requires 14 routers and a test server. Reading the system requirements for such a setup made me decide not to install on my laptop.

I went ahead and installed it on a not so small ESX server: A new UCS machine (24 cores, 380G memory, running 4 VMs, including VIRL), ESX 5.1.

I have allocated VIRL 4vCPU, 16GB memory.

The installation was not that short, but not that hard either. After the installation was over, I installed VM Maestro and started building my lab. Working with VM Maestro, which is VIRL's GUI, was really easy. The only annoying thing was my inability to set the interface numbers for the connections between routers.

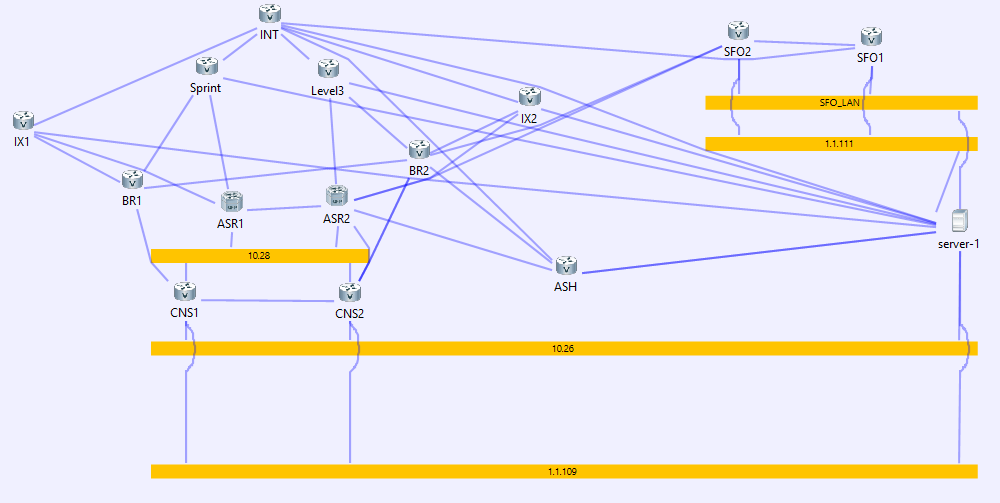
Here is how my final setup looks like:


The setup is running 12 vIOS, 2 CSR1K, and one Ubuntu server, from where I ran my automated tests.

I pressed on "Start simulation" and then when trouble started. It took about 40 minutes for all the routers to load. Then the CLI felt like 2400 baud. It was crawling!

Notice that each time you start the simulation, for example after adding or removing a link, all the routers are rebuild from scratch. They are not just powered on. They are cloned from a template and go through lengthy installation process. Especially the ASRs which take forever to install themselves.

So I tried to run just 4 routers. That was working well and everything was snappy.

Then I tried to upgrade the VM to 6 vCPUs. Now it took just 3 minutes to load all the routers. The CLI felt much better at 9600 baud.

Then I tried to upgrade the VM to 8 vCPUs. Now everything works almost as fast as GNS3 with IOU!

After setting up the lab foundation, it was time actually to start configuring the lab. I have configured OSPF and BGP. Everything worked, but the response time was slower. Although the response time was slower, the lab was very usable.

To run the test, I am using some VRF magic and bash scripting on the Linux machine. I think it worth a blog entry on its own. Then after 30 minute of stepping away from the lab, I noticed that most OSPF and BGP sessions were lost. I had to press "enter" several times on each router's prompt to wake everything up:

Just when I wake the routers:

16:54:20 +++++-+---+-+---+--++++--++--+-+++++++++
16:54:33 +++++++++++++++++++++++--+++++++++++++++
16:54:36 +++++++++++++++++++++++--+++++++++++++++
16:54:40 ++++++++++++++++++++++++++++++++++++++++
16:54:42 ++++++++++++++++++++++++++++++++++++++++
16:54:43 ++++++++++++++++++++++++++++++++++++++++
16:54:45 ++++++++++++++++++++++++++++++++++++++++

After 30 minutes:
 
17:21:53 ++++++++++++++++++++++++++++++++++++++++
17:21:55 ++++++++++++++++++++++++++++++++++++++++
17:21:56 ++++++++++++++++++++++++++++++++++++++++
17:21:58 ++++++++++++++++++++++++++++++++++++++++
17:22:00 ++++++++++++++++++++++++++++++++++++++++
17:22:01 ++++++++++++++--+------++++--+--+-++++++
time     111112222222333333444445555666677788899B
%H:%M:%S 589BC34679BC4679BC679BC89BC79BC9BC9BCBCC
17:22:17 +++++-----+-----+------++++--+--+-++++++
17:22:40 +++++-----+-----+------++++--+--+-++++++
17:23:02 +++++-----+-----+------++++--+--+-++++++
17:23:24 +++++-----+-----+------++++--+--+-++++++